Blog
Attic Air Sealing Cost in 2026: Pro vs DIY, What's Included, and the Leaks That Pay
Attic air sealing cost in 2026: $350–$1,200 for a typical pro job, $50–$300 for DIY materials. What's included, why you seal before insulating, and how to compare quotes.
If you are searching "attic air sealing cost," you have probably noticed something annoying: most of the pages that come up are really insulation articles that mention air sealing in passing. The sealing itself, the part that often matters most for comfort, gets one vague line.
So here is the straight answer. A professional attic air seal runs about $350 to $1,200 for a typical single-family home, usually written as a line item on an insulation quote. If you do the labor yourself, the materials run $50 to $300. The spread is driven by how many holes there are in your ceiling and how hard your attic is to crawl around in, not by square footage.
I have spent a lot of hours on my knees in attics. The numbers below are 2026 planning ranges, not promises. Use them to read a quote, then check payback against your own bills.
On this page
- Quick answer: what attic air sealing costs in 2026
- Why you air seal before you insulate
- What's included in a professional air seal
- The chimney and flue: where DIY stops
- Air sealing vs spray foam vs dense-pack at the plane
- DIY vs pro: a practical decision table
- DIY materials: what to actually buy
- Measuring the result: the blower door
- Savings and payback: honest math
- What drives the cost up
- Getting quotes you can compare
- Common mistakes to avoid
- Sources and further reading
Quick answer: what attic air sealing costs in 2026
$350–$1,200
Pro air sealing (typical)
line item on an insulation quote
$50–$300
DIY materials
caulk, canned foam, weatherstrip
$20–$30 each
Recessed-light covers
biggest swing in DIY cost
~15%
Avg heating/cooling savings
EPA, sealing + insulating (10–20%)
Attic air sealing cost (2026 planning ranges)
many can lights, chimney chase, balloon framing
A note on what these numbers cover: this is the sealing only. The insulation that goes on top is a separate line. If you want the combined air-seal-plus-insulate picture, or you are in New England specifically, see the Boston attic insulation and air sealing cost guide, which walks through Mass Save incentives and old-housing-stock gotchas. This page is the general national guide to the sealing side.
Why you air seal before you insulate
This is the part most homeowners get backwards, so slow down here.
Insulation fights conduction. It slows heat moving through a solid, which is why a thick blanket of cellulose or fiberglass keeps the attic floor from radiating your heat away. What insulation does almost nothing about is air moving through and around it. Loose-fill is fluffy and porous on purpose. Warm air rises, finds a gap at a top plate or a pipe, and slips right past the insulation like it is not there.
That movement is the stack effect. Warm air leaking out the top of the house pulls cold air in at the bottom, all winter, around the clock. Sealing the ceiling plane is what stops it. Insulation built on top of a sealed plane finally gets to do its job.
Do it in the wrong order and you pay twice. Blow insulation first and the leaks are now buried under a foot of material. To seal them you have to rake all that back, find the penetrations, seal, and re-cover. That is why any contractor worth hiring sequences it the same way: seal the plane, then build the pile.
Marcus's rule: seal the plane before you build the pile
The depth of insulation you can see is the part homeowners fixate on. The part that actually moves your bill is the continuity of the air barrier underneath it. Seal at every top plate, penetration, and chase first. Then build R-value to the eaves. Insulation blown over unsealed leaks just hides the problem and costs you the chance to fix it cheaply.
What's included in a professional air seal
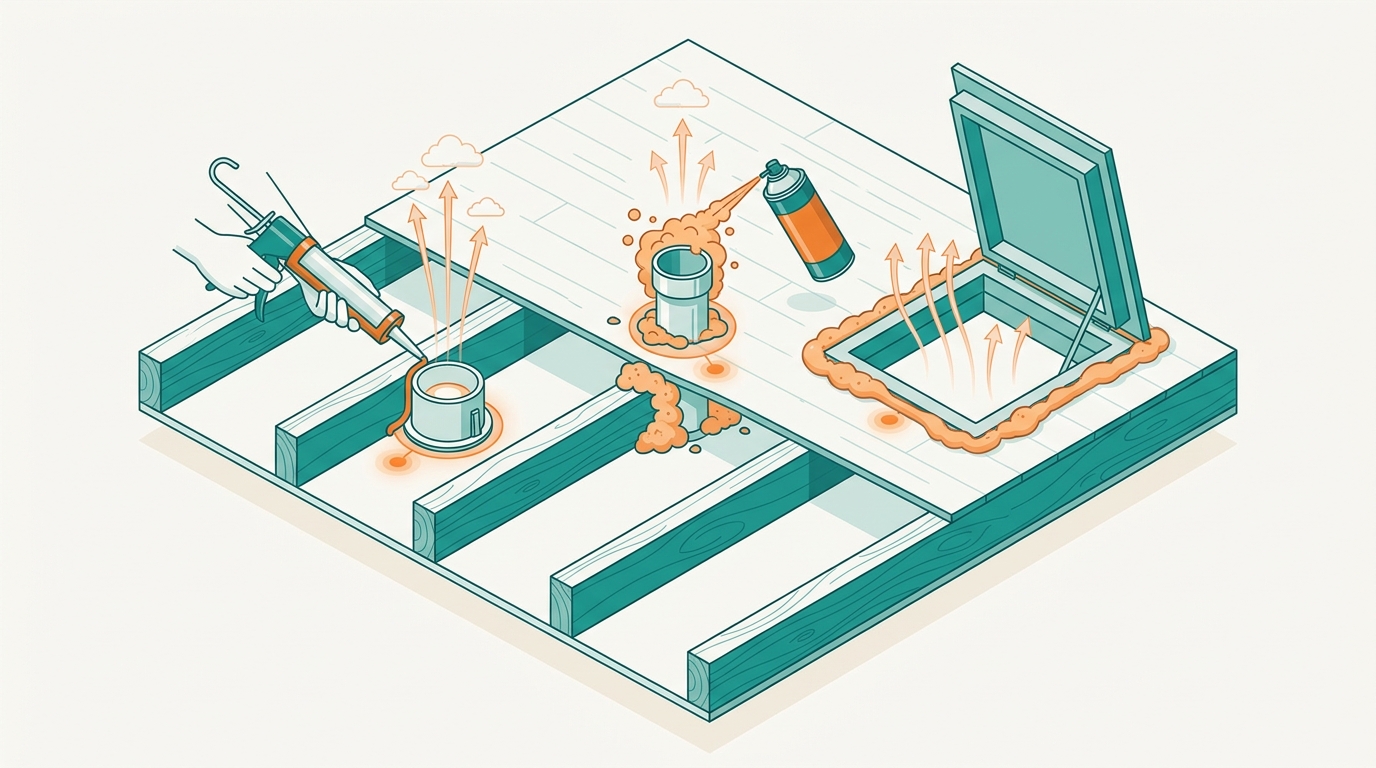
When I quote an attic, "air sealing" means going after every place conditioned air can escape into the attic. In rough order of how much they leak:
- Top plates and framing gaps. The long seams where interior walls meet the attic floor. These are easy to ignore and add up fast. On more than one job I have shut off my headlamp and seen daylight at a top plate from inside the attic. That is your heating dollars leaving.
- Plumbing and wiring penetrations. Every pipe, vent stack, and wire bundle that pokes through the ceiling has a ragged gap around it. Caulk for the small ones, canned foam for the rest.
- Recessed (can) lights. The single biggest cost swing. Older non-IC-rated cans leak badly and cannot just be foamed over. Each one needs an airtight rated cover. At $20–$30 a cover and 20 to 30 cans in some homes, this alone can be $400–$900 of the job.
- Attic hatch or pull-down stairs. Often the biggest single leak in the house and the one homeowners forget. It needs weatherstripping plus an insulated cover or box over the opening.
- Dropped soffits. The boxed-out areas above kitchen cabinets and bathrooms are usually open straight to the attic. They get capped with rigid foam and sealed.
- Bath fan and duct boots. Sealed at the ceiling plane, and the duct confirmed to vent outdoors, not into the attic.
- Open chases and knee walls. Stud bays and chases that run up from lower floors are a chimney for warm air. The tops get blocked and sealed before insulation goes on. Knee-wall attics in Capes add detail and cost.
- The chimney or flue chase. Special case, covered below.
I once spent an afternoon on a 1950s ranch where the homeowner had iced-up gutters every February. The fix was not more insulation. It was capping a dozen open can lights with rated covers and sealing the hatch. Warm air had been streaming up through those lights, melting the roof snow, and refreezing at the eaves into ice dams. Cheap parts, big result.
The chimney and flue: where DIY stops
This is the one spot where you do not improvise. A masonry chimney chase or a metal B-vent gets hot, and foam or ordinary caulk against it is a fire hazard. The correct detail is sheet metal cut to fit, held off the flue to the code-required clearance (usually one inch from masonry, more from a metal vent), and then sealed with high-temp fire-rated caulk rated for the gap.
On an old farmhouse I worked on, the chimney chase was a wide-open framed shaft running from the basement to the roof, basically a flue for the whole house's warm air. We packed it with mineral wool, which is non-combustible, then sealed the top with sheet metal and fire-rated caulk. That single detail moved the blower-door number more than everything else combined.
There is a second safety issue beyond fire. Tighten a house too much around an atmospheric-vented gas furnace or water heater and you can cause it to backdraft, pulling combustion gases (including carbon monoxide) back into the living space instead of up the flue. A competent contractor runs a combustion-safety test after sealing. If your home has older atmospheric-vented gas appliances, this is reason enough to hire out the work.
Combustion safety is not optional
If you have a gas furnace, gas water heater, or any atmospheric-vented combustion appliance, do not seal the house tight without a combustion-safety (worst-case depressurization) check afterward. Backdrafting is rare but dangerous. This is a real reason to bring in a pro rather than DIY the whole attic.
Air sealing vs spray foam vs dense-pack at the plane
People conflate "air sealing" with "spray foam," so it helps to separate the methods:
- Targeted air sealing is the dedicated step described above: caulk, canned foam, rigid foam covers, and fire-rated materials applied to specific leaks on the attic floor. It is cheap and high-leverage. This is the $350–$1,200 line item.
- Open-cell spray foam at the roofline seals and insulates in one shot, but it is a different and far more expensive scope (often $1.50–$4.50+ per board foot) and changes your attic from vented to unvented. It is a whole-envelope decision, not a sealing line item.
- Dense-pack cellulose packed into closed cavities resists air movement through the layer and is great for walls and sloped roofs, but it is not a substitute for sealing the discrete penetrations on an open attic floor.
For an open vented attic, which is most homes, the right answer is almost always targeted air sealing of the floor plane followed by blown-in insulation. You do not need spray foam to get an air seal. You need someone who actually seals the penetrations.
DIY vs pro: a practical decision table
| DIY air sealing | Pro air sealing | |
|---|---|---|
| Typical cost | $50–$300 materials | $350–$1,200 |
| Best for | Accessible penetrations, the hatch, simple attics | Many can lights, chimney chase, tight access, gas appliances |
| Materials | Caulk, canned foam, weatherstrip, rated can covers | Same, plus sheet metal, fire-rated caulk, mineral wool |
| Verification | Visual; rent or borrow a smoke pencil | Blower door before/after, combustion-safety check |
| Risk | Missing hidden chases; fire/backdraft if you go near the flue | Higher cash cost |
| Time | A weekend or more | Usually under a day |
DIY makes sense when access is good, the leaks are obvious, and there is no flue or combustion-safety concern in the work area. Hire out when there are a lot of can lights, the attic is a crawl-back nightmare, you have atmospheric-vented gas appliances, or you simply want the leakage measured and verified.
DIY materials: what to actually buy
If you are doing accessible leaks yourself, here is the kit:
- Canned spray foam for gaps roughly a quarter inch to three inches. A typical attic eats 12 to 48 cans depending on penetration count, which is most of the $50–$150 you will spend on foam.
- Caulk (a quality acrylic-latex or siliconized acrylic) for gaps under a quarter inch, like the seam where a top plate meets drywall.
- Rated recessed-light covers for any can light you are not certain is airtight and IC-rated. $20–$30 each, and the line item that adds up.
- Rigid foam board plus foil tape or canned foam to cap dropped soffits and large openings.
- Weatherstripping and an insulated hatch cover for the attic access. High value, low cost.
- Fire-rated (high-temp) caulk and sheet metal only if you are competent around a flue. If you are not sure, leave the flue to a pro.
Wear a respirator and eye protection, work off the joists or boards (not the drywall between them), and do not block soffit vents.
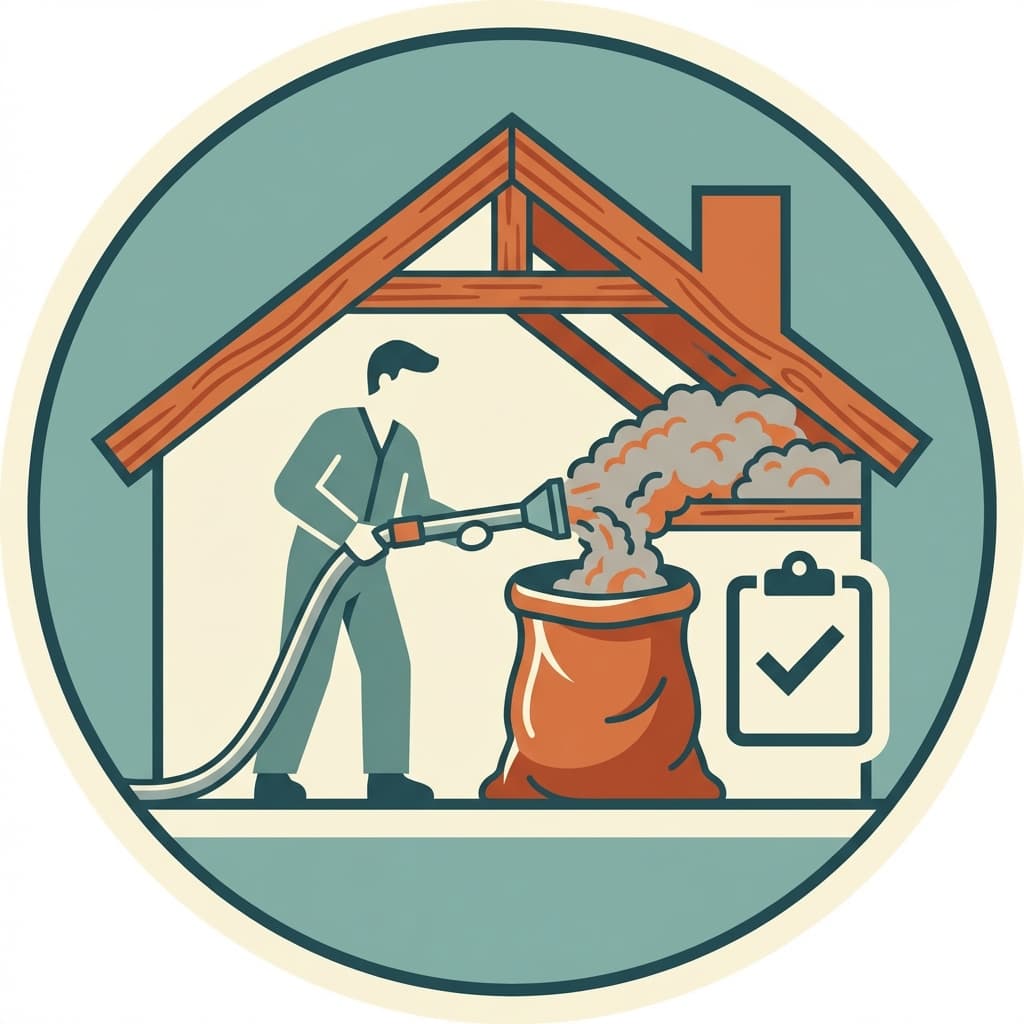
Measuring the result: the blower door
Air sealing is one of the few home upgrades you can actually measure. A blower door is a calibrated fan mounted in an exterior doorway that depressurizes the house and reads total leakage in CFM50 (cubic feet per minute at 50 pascals). Run it before and after and you get a hard number on how much tighter the house is, instead of a hopeful guess.
Many contractors include a blower door with air sealing. Standalone, it runs about $150–$400 and is frequently bundled into a home energy audit. For more on what the test involves and what the numbers mean, see blower door test cost. If a contractor does not offer one, ask how they confirm the sealing is complete: smoke pencils, infrared imaging, or a documented penetration-by-penetration checklist are all reasonable answers. "We just seal everything we see" is not.
Savings and payback: honest math
The EPA estimates that sealing air leaks and adding attic insulation together save an average of about 15% on heating and cooling, with a typical range of 10–20%. Air sealing alone captures part of that; the full figure assumes you also insulate.
Here is the math on a typical home (illustrative):
- Heating and cooling spend: about $1,800 a year (pull yours from bills or the why is my energy bill so high walkthrough).
- Reduction from air sealing plus insulation: 10–20%.
- Annual savings: roughly $180–$360.
Now look at the payback on the sealing portion specifically. A $350–$1,200 pro air seal that trims $150–$300 a year pays back in roughly 3 to 8 years. DIY materials at $50–$300 can pay back in a single heating season. That is why air sealing is the best dollar-for-dollar move in the attic: it is cheap, and it is doing a disproportionate share of the work. The insulation that follows has a longer payback but locks in comfort and lets the next heating or cooling system you buy be smaller.
Run your own numbers with the insulation and air sealing ROI tool, and for a fuller worked example see attic insulation ROI.
What drives the cost up
Same principle as everything above: holes and access, not square footage.
- Recessed lights. The biggest single swing. Every can needs a rated cover.
- Chimney and flue chases. Non-combustible materials and careful clearances take time.
- Balloon framing and open stud bays. Common in pre-1950 homes; the tops have to be capped before insulating.
- Existing insulation. If there is loose-fill already down, someone has to rake it back to reach the plane, then re-cover.
- Access. Low headroom, a tiny hatch, a crawl-back attic, summer heat: all slow the work.
- Knob-and-tube wiring. You cannot bury active knob-and-tube; it has to be evaluated by an electrician first, which can stall the whole job.
- Verification. Adding a blower door and combustion-safety test is worth it, but it is a line item.
Getting quotes you can compare
Air sealing scope is where weak quotes go vague, so make them specific. Ask for these in writing:
- Which leak locations will be sealed? Get top plates, penetrations, can lights, the hatch, dropped soffits, and the chimney chase named individually.
- How are recessed lights handled: rated covers, or excluded?
- How is the attic hatch or pull-down stair sealed?
- How is the chimney or flue chase handled, and with what materials?
- Is there a blower door before and after? A combustion-safety check?
- What is excluded (unsafe areas, knob-and-tube, finish work)?
If a contractor will not itemize the sealing scope, keep shopping. A low quote often means the air sealing is missing or hand-waved, and that is the part you came for. When you are ready to line up installers, the insulation upgrade hub walks through the full sequence and related fixes.
Common mistakes to avoid
- Chasing tiny gaps for hours while leaving big chases and dropped soffits wide open.
- Insulating first, then trying to seal later. Now you are paying to dig out material you just installed.
- Foaming around a flue or B-vent. Fire hazard. That gap needs metal and high-temp sealant.
- Tightening the house with atmospheric-vented gas appliances and no combustion-safety check.
- Treating "spray foam" as the only way to get an air seal. Targeted sealing of the floor plane is cheaper and right for most vented attics.
Sources and further reading
Sources & further reading
- Air Sealing Your Home — U.S. Department of Energy
- Rule Your Attic! For Comfort and Savings — ENERGY STAR
- Seal and Insulate with ENERGY STAR — ENERGY STAR / EPA
About this post: We wrote this to help homeowners price attic air sealing and compare scope based on what actually leaks, what is safe to DIY, and how the work gets verified. If you are unsure about a flue, gas appliances, or old wiring, hire qualified professionals. Safety beats savings.
Frequently asked questions
How much does attic air sealing cost?+
Professional attic air sealing runs $350–$1,200 for a typical single-family attic, usually shown as a line item on an insulation quote. DIY materials cost $50–$300 if you do the labor yourself, mostly canned foam and caulk, plus $20–$30 each for recessed-light covers. Price is set by the number of penetrations and how hard the attic is to work in, not by floor area. Attics with many can lights, a masonry chimney chase, or balloon-framed stud bays push toward the high end or beyond.
Is it cheaper to air seal an attic yourself?+
Yes on materials, no on guaranteed results. DIY materials run $50–$300 for a typical attic versus $350–$1,200 for a pro, so the cash savings are real. But the value of air sealing comes from finding and sealing every major leak, and homeowners routinely miss hidden chases, dropped soffits, and open stud-bay tops. A pro with a blower door can measure leakage and verify the work. DIY makes sense for accessible penetrations and the attic hatch; leave flues, knob-and-tube, and tight crawl-back attics to a contractor.
What's included in professional attic air sealing?+
A complete scope seals the ceiling plane at every major bypass: top plates along framing, plumbing and wiring penetrations, recessed-light housings (with rated covers), bath-fan and duct boots, the attic hatch or pull-down stairs, dropped soffits over cabinets, open chases, and the chimney or flue chase with sheet metal and high-temp fire-rated sealant. Caulk handles gaps under a quarter inch, canned foam handles the rest, and rigid foam covers cap large openings. A good contractor verifies the work with a blower door before and after.
Should I air seal or insulate first?+
Air seal first, then insulate. Insulation slows heat conduction but does almost nothing to stop air moving through and around it, so insulation blown over unsealed leaks underperforms and hides the leaks you still need to reach. Sealing the attic floor shuts down the stack effect that pushes heated air out the top of the house all winter. Once the plane is sealed, build insulation depth to R-49 or R-60. A quote that names an R-value but no air sealing scope is skipping the highest-value part of the job.
How much can air sealing save on energy bills?+
The EPA estimates that sealing air leaks and adding attic insulation saves an average of about 15% on heating and cooling costs, with a typical range of 10–20%. On a $1,800 annual heating-and-cooling spend, that is roughly $180–$360 a year. Air sealing alone delivers part of that; pairing it with insulation captures the full effect. Comfort improves immediately because drafts and the stack effect stop, even before the savings show up on a bill.
What's the payback on attic air sealing?+
Air sealing has one of the fastest paybacks in home efficiency because it is cheap relative to its impact. A $350–$1,200 pro job that trims $150–$300 a year off heating and cooling pays back in roughly 3–8 years; DIY materials at $50–$300 can pay back in a single season. Payback stretches longer when you combine it with a several-thousand-dollar insulation project, but the air sealing portion is almost always the best dollar-for-dollar part of the spend.
Can you air seal an attic that already has insulation?+
Not easily. You have to access the ceiling plane to seal it, which means raking back or removing existing insulation, sealing the penetrations, then re-covering or re-blowing. That is why air sealing is sequenced before adding insulation: doing it after means disturbing or removing material you just paid for. If your attic already has loose-fill and you are topping it up, ask the contractor to rake back, seal the major bypasses, and re-cover rather than blowing straight over leaks.
Do you need a blower door test for air sealing?+
It is not required, but it turns guesswork into a number. A blower door depressurizes the house and measures total leakage (CFM50), so a before-and-after pair shows exactly how much the air sealing reduced infiltration. Many contractors include it; standalone it runs about $150–$400 and is often bundled into a home energy audit. Without one, ask the contractor how they confirm the sealing is complete, such as smoke pencils, infrared, or a documented penetration checklist.
Is attic air sealing safe to DIY around the chimney and gas appliances?+
Seal the easy penetrations yourself, but stop at the flue and any combustion appliance. Foam and ordinary caulk near a hot flue or B-vent are a fire hazard; that gap needs sheet metal held off the pipe to code clearance and high-temp fire-rated sealant. Over-tightening a house can also cause a gas furnace or water heater to backdraft combustion gases indoors. If your home has atmospheric-vented gas appliances or knob-and-tube wiring, get a pro who can run a combustion-safety test after sealing.
What drives attic air sealing cost up?+
Penetration count and access, more than square footage. A 900-square-foot attic with 25 can lights, a chimney chase, and balloon-framed stud bays costs more to seal than a clean 1,400-square-foot attic with a handful of pipes. Low headroom, deep existing insulation that must be raked back, knob-and-tube remediation, and a desire for blower-door verification all add cost. The single biggest swing is usually recessed lights, because each one needs an airtight rated cover.
Try the companion tool
This post links to an interactive tool built for this topic. Open it to see numbers tailored to your home.
Open the toolGet practical energy tips
Join homeowners getting practical tips on cutting energy bills and staying comfortable.
Practical tips only. Unsubscribe anytime.
Read this next
Related guides selected by topic overlap and upgrade path.

Attic insulation typically pays back in 2–8 years and trims heating and cooling bills ~15%. Real 2026 install costs, R-value targets, and a worked payback example.

Attic insulation costs about $1,500 to $3,500 for a typical home, or $1.50 to $4 per sq ft. See 2026 prices by material, attic size, and tax credit.

Blown-in insulation costs $1.50 to $3.50 per sq ft installed in 2026 ($0.90 to $1.80 DIY). Cellulose vs fiberglass by R-value, attic vs walls, bags needed.
Attic insulation removal costs $1–$2 per sq ft, or about $1,600–$3,600 for a typical attic. Rodents, mold, or asbestos push it far higher. Here's the honest 2026 breakdown.