Blog
Blower Door Test Cost: 2026 Prices and What the Number Tells You
A standalone blower door test runs $150 to $400 in 2026. It's often free through a utility, or bundled into a $300 to $700 audit. Here's what it measures and when paying makes sense.
If you are searching blower door test cost, here is the short answer. A standalone blower door test runs $150 to $400 for a typical single-family home in 2026, with most people paying around $250 to $350. It is often free through a utility or state program, and it is frequently bundled into a full energy audit that costs $300 to $700. What you pay depends mostly on whether you buy the test alone, get it inside a bigger diagnostic, or qualify for a subsidized program.
The price is the easy part. What matters is whether the test changes what you do next, or just hands you a number to file away. A blower door test earns its fee when it produces a leak map and a prioritized fix list. A reading on a meter, by itself, does not.
$150–$400
Standalone test
most pay $250–$350
$0
Often free via utility
check your program first
$300–$700
Bundled in a full audit
with infrared + report
Before you book anything, run Attic Insulation ROI to connect a tighter envelope to actual savings. It shows what air sealing and insulation are worth in your home, so the test's findings have something to land against.
On this page
- Blower door test cost by scenario
- What a blower door test actually measures
- What good vs. leaky numbers look like
- How the test is done, step by step
- What you should get for the money
- When a blower door test is worth paying for
- Before air sealing or insulation
- To verify the work actually worked
- Before sizing a new heat pump or furnace
- For code, HERS, or a new build
- Can you DIY a blower door test?
- Free or discounted tests: check these first
- How to find and choose a tester
- Connect the test to a plan
Blower door test cost by scenario
Quotes vary so much because "blower door test" can mean three different purchases. Here is how the common paths price out in 2026. Treat these as estimates; they shift with region, home size, and how much the tester explains.
| Scenario | What you get | Typical 2026 cost |
|---|---|---|
| Utility or state program | Test as part of a subsidized assessment, often with free LEDs, a smart thermostat, or pipe insulation | $0 to $100 |
| Standalone test | Calibrated test, CFM50 / ACH50 reading, and a leak walkthrough | $150 to $400 |
| Bundled in a full audit | Blower door plus infrared scan, combustion safety check, and a written, prioritized report | $300 to $700 |
| Before-and-after package | Two tests, baseline and post-work, to verify air sealing | Often discounted vs. two separate visits |
| Per-unit (duplex / multi-family) | Separate setup and fan for each unit | $250 to $350 per unit |
Blower door test cost by scenario
Why the price spread is so wide
You are not really paying for the fan. You are paying for the time the tester spends finding your leaks and turning the numbers into a plan. A rushed visit hands you a CFM50 reading and leaves. A good one walks the depressurized house with you, points to the attic hatch gushing cold air, and gives you a fix list in priority order. Same equipment, very different value.
What a blower door test actually measures
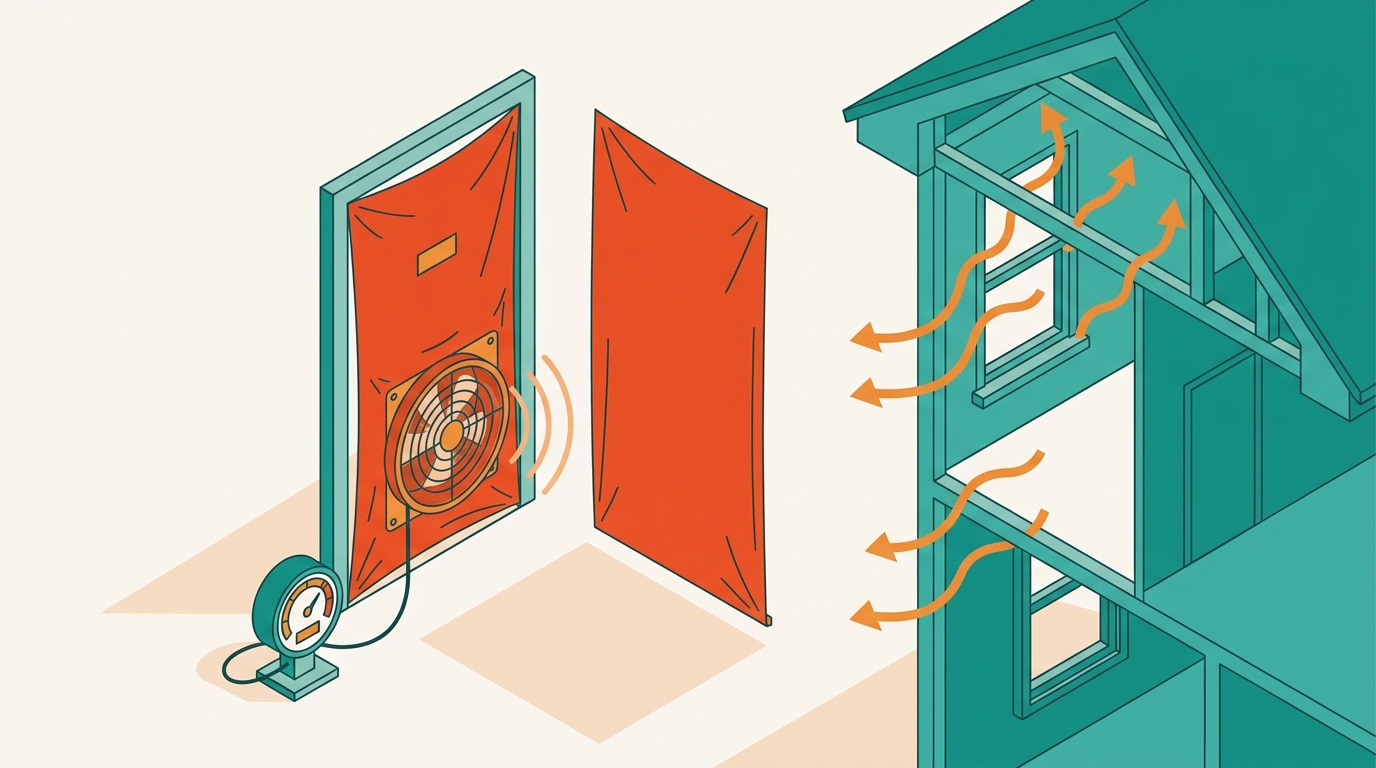
A blower door is a calibrated fan that a tester mounts into the frame of an exterior doorway. The fan pulls air out of the house and lowers the indoor pressure. Higher outside pressure then flows in through every unsealed gap. The standard reads the house at 50 pascals of depressurization, which is roughly the pressure a 20 mph wind would put on all your walls at once. Holding that same pressure for every house is what makes the results comparable.
You get two numbers:
- CFM50 is the cubic feet of air per minute the fan has to move to hold the house at 50 pascals. It is the raw leakage rate. A higher CFM50 means a leakier house.
- ACH50 is air changes per hour at 50 pascals. It takes the CFM50, multiplies by 60, and divides by your home's volume, so it normalizes for size. ACH50 lets you compare a 1,200 sq ft ranch to a 3,000 sq ft colonial fairly.
A manometer (a precise pressure gauge) reads both the house pressure and the fan flow at the same time. That pairing separates a real test from a vague "feels drafty" guess.
What good vs. leaky numbers look like
Lower is tighter. Here is the rough ladder, from leaky to airtight:
| Envelope | Approximate ACH50 | What it means |
|---|---|---|
| Very leaky older home | 15 to 25+ | Big bypasses; air sealing usually has fast payback |
| Typical existing US home | 7 to 10 | Plenty of room to improve |
| Tightened retrofit | 4 to 6 | Solid result after air sealing |
| New construction (2021 IECC) | 3 to 5 | Code target, varies by climate zone |
| Passive House | ~0.6 | Extremely tight; needs mechanical ventilation |
A common, achievable retrofit story is dropping from around 9 ACH50 to 4 or 5 after a focused air sealing job. That is the kind of change you feel in comfort and see on the heating bill.
Tight houses need a ventilation plan
You can make a house too tight without a plan for fresh air. As the envelope drops below roughly 3 to 5 ACH50, building codes and good practice call for mechanical ventilation so indoor air quality stays healthy. For most existing homes that are leaky to begin with, this is not the immediate worry, but it is why a good tester talks about ventilation, not just sealing.
How the test is done, step by step
From our reviewer Marcus's perspective, here is what a real visit looks like.
- Set up the house. Close all windows and exterior doors, open interior doors, and shut off combustion appliances so the house tests as one connected zone. Fireplaces get a cover so ash does not get pulled into the room.
- Seal the fan into the doorway. The calibrated fan mounts in an adjustable aluminum frame with a fabric panel that seals to an open exterior door.
- Depressurize to 50 pascals. The fan ramps up until the manometer holds the house at -50 pascals. At that point the leaks announce themselves.
- Read the numbers. The manometer reports CFM50, and the software converts it to ACH50 using the home's volume.
- Hunt the leaks. This is the valuable part. With the fan still running, the tester walks the house with a smoke pencil or an infrared camera. Outside air is now pouring in through every gap, so the smoke streams sideways at a leak and the thermal camera shows cold air washing across the drywall.
On one 1970s split-level, Marcus pulled the house to -50 Pa and the attic-hatch pull-down stairs turned into a gusher. You could feel a steady cold river pouring down past the trim while the fan ran. That single reading turned a vague "the upstairs never warms up" complaint into a one-afternoon job: weatherstrip the hatch, seal the top plates, and box in the chase. The smoke pencil held at the rim joist in the basement showed the second-biggest leak, a continuous line where the framing sits on the foundation. Neither was visible without the fan creating that pressure.
What you should get for the money
At minimum, a quality test leaves you with:
- A baseline number (CFM50 and ACH50), explained in plain language
- A leak walkthrough showing where the biggest air paths are, ideally with photos or notes
- A prioritized fix list you can hand to a contractor or work through yourself
- A clear answer on whether before-and-after retesting is available if you plan to weatherize
If a tester hands you only a number and packs up, you paid for a fraction of the value. The leak map is the deliverable that changes decisions.
When a blower door test is worth paying for
Before air sealing or insulation
This is the highest-value case. The test tells you where to spend, so your money goes to the attic bypasses, top plates, and rim joist instead of caulk on baseboards that barely move the needle. It also stops a classic mistake: blowing a foot of attic insulation on top of unsealed leaks, which underperforms and can hide moisture problems. Air seal first, then insulate. Our attic air sealing cost guide prices the follow-up work.
To verify the work actually worked
A before-and-after pair is the cleanest proof air sealing did something. The number drops, and you have evidence the investment paid off. If you are spending real money on a retrofit, this is the verification step worth building in.
Before sizing a new heat pump or furnace
Tightening a leaky home lowers the heating and cooling load, which can change equipment sizing and comfort. Measuring the envelope before you size a heat pump keeps you from oversizing for leaks you are about to seal. See why your energy bill is high for how leakage feeds into that load.
For code, HERS, or a new build
New construction in much of the country now requires a blower door test to demonstrate code-level airtightness (3 to 5 ACH50 under the 2021 IECC, by climate zone). A HERS rating, used for energy scoring and some financing, also requires the test. In those cases the test is not optional and is usually built into the project.
Can you DIY a blower door test?
Not a real one. A calibrated fan and manometer run a few thousand dollars and take training to use correctly, so a one-time DIY test does not pencil out. What you can do for free is a useful approximation:
- On a windy or cold day, walk the house with an incense stick or a damp hand near outlets, switch plates, window trim, the attic hatch, and the rim joist. Drafts move the smoke or chill your skin.
- Check attic insulation depth against the framing while you are up there.
- Review where your energy actually goes, then size up the payback with Attic Insulation ROI and read why air sealing comes first in our insulation upgrade guide.
The DIY pass finds obvious leaks and makes a good gut check. It cannot give you a calibrated CFM50 or ACH50 baseline, or before-and-after proof. Those numbers, and that verification, are what you pay a pro for.
Free or discounted tests: check these first
Before you pay full price, see what is already available.
Your electric and gas utility. Many utilities run residential energy-assessment programs funded by efficiency charges already on your bill. These often include a free blower door test plus free direct-install items like LED bulbs, a smart thermostat, or pipe insulation. Massachusetts homeowners know this as Mass Save; other states run similar programs under different names. Start on your utility's website and search for "home energy assessment."
Your state energy office. Most states list incentive programs, approved contractors, and sometimes subsidized testing.
Weatherization assistance. Income-qualified households can often get free testing and free weatherization work through the federal Weatherization Assistance Program, administered locally.
Free is not always full
A free utility test is a real test, and the freebies that come with it can cover a chunk of your next bill. But some programs skip the detailed written report. If you are planning a major retrofit, confirm you get the numbers in writing and a leak walkthrough, not just a verbal "you're a bit leaky."
How to find and choose a tester
Look for certification from BPI (Building Performance Institute) or RESNET (Residential Energy Services Network). A BPI Building Analyst or RESNET HERS Rater has been trained in blower door testing, building science, and combustion safety, and both organizations publish searchable directories. Your utility or state program may also keep a list of approved contractors, which is usually the path to a free or subsidized test.
Before you book, ask:
- Is the test calibrated, and do I get the CFM50 and ACH50 numbers in writing?
- Will you walk me through the major leaks and give me a prioritized fix list?
- Is the test standalone, or part of a broader audit with infrared and combustion safety?
- Can you do before-and-after testing if I weatherize?
Combustion safety matters when you tighten
If you have an atmospheric gas water heater, furnace, or boiler, tightening the house can change how those appliances vent. Marcus once found a water heater that backdrafted, spilling combustion gases into a basement, but only after the bath fan and dryer ran together and depressurized the house. A credible tester checks for this. Ask about combustion safety before you seal aggressively.
Connect the test to a plan
A test is only as good as what you do with it. Two ways to keep going:
- See how the test fits into a broader diagnostic in our home energy audit cost guide, and price the sealing work with attic air sealing cost.
- For a regional example of how testing, sealing, and insulation stack up, see attic insulation and air sealing cost in Boston.
Then run the numbers for your own home with Attic Insulation ROI so the test's leak list turns into a budgeted, sequenced plan.
Sources & further reading
- Blower Door Tests: how they work and what they measure — U.S. Department of Energy
- Home energy audits: what they cover and how to find help — U.S. Department of Energy
- Home energy assessments and what to expect — ENERGY STAR
- Find a certified Building Analyst (blower door testing) — Building Performance Institute (BPI)
- Find a RESNET HERS Rater — RESNET
Frequently asked questions
How much does a blower door test cost in 2026?+
A standalone blower door test costs $150 to $400 for a typical single-family home in 2026, with most homeowners paying around $250 to $350. Many utility and state efficiency programs run the test for free or for a small copay as part of a subsidized home assessment, so check there first. When a blower door is bundled into a full diagnostic energy audit with an infrared scan and written report, the whole visit runs $300 to $700. Duplexes and multi-family buildings cost more, often $250 to $350 per unit, because each unit needs a separate setup.
What does a blower door test measure?+
It measures how leaky your house is. A calibrated fan in an exterior doorway depressurizes the home to 50 pascals (about the pressure of a 20 mph wind on every wall), and the manometer reports the airflow needed to hold that pressure. The two numbers you get are CFM50, the cubic feet of air per minute leaking at 50 pascals, and ACH50, the air changes per hour, which divides that leakage by your home's volume so you can compare houses of different sizes. Lower is tighter. These are the baseline numbers contractors verify before and after air sealing.
What is a good ACH50 number?+
Lower is tighter. A leaky older home often tests at 10 to 20 ACH50 or higher. A typical existing US home lands around 7 to 10 ACH50. The 2021 IECC energy code requires 3 to 5 ACH50 for new construction depending on climate zone, and many programs target 3 ACH50 or below. Passive House is roughly 0.6 ACH50, which is extremely tight and needs mechanical ventilation. For a retrofit, dropping from 9 to 4 or 5 ACH50 is a strong, realistic result that you can feel in comfort and see on the bill.
Is a blower door test worth it?+
It is worth paying for when the number will change what you do next: before air sealing or insulation so you know where to spend, after the work to verify it actually tightened the house, or before sizing a new heat pump or furnace so the equipment matches a tighter envelope. The real value is the leak map and prioritized fix list the tester produces while the fan runs, not the single number. If you only get a number with no walkthrough, you overpaid. For a newer, already tight home, or when the leaks are obvious, you may not need the test at all.
Can I get a free blower door test?+
Often, yes. Many electric and gas utilities run subsidized home energy assessments that include a blower door test at no cost or a small copay, frequently bundling free LED bulbs, a smart thermostat, or pipe insulation. The federal Weatherization Assistance Program and state energy offices provide free testing and free weatherization for income-qualified households. Start at your utility's website and search for home energy assessment before paying out of pocket. Free programs sometimes skip the detailed written report, so confirm what deliverable you get.
How is a blower door test done?+
The tester seals a calibrated fan into an open exterior doorway with an adjustable frame and fabric panel, closes windows and exterior doors, and opens interior doors so the house tests as one zone. The fan pulls air out until the manometer reads 50 pascals of depressurization. At that pressure, outside air rushes in through every gap, so the tester walks the house with a smoke pencil or an infrared camera to find leaks at the attic hatch, recessed lights, top plates, rim joists, and plumbing and wiring penetrations. The whole visit takes about 1 to 2 hours.
Can I do a blower door test myself?+
Not a real one. A calibrated blower door fan and manometer cost a few thousand dollars and need training to run correctly, so DIY is not practical for a one-time test. You can do a useful free approximation: on a windy or cold day, walk the house with an incense stick or a damp hand near outlets, the attic hatch, window trim, and the rim joist to feel drafts. That finds the obvious leaks. It will not give you a CFM50 or ACH50 baseline, and it cannot verify before-and-after improvement, which is the whole point of paying a pro.
How do I find a certified blower door tester?+
Search the BPI (Building Performance Institute) directory at bpi.org or the RESNET (Residential Energy Services Network) directory at resnet.us by location. A BPI Building Analyst or RESNET HERS Rater is trained in blower door testing, building science, and combustion safety. Your utility or state energy office usually keeps its own list of approved contractors for rebate programs, which is also the path to a free or subsidized test. Before booking, confirm the test is calibrated, ask whether you get a leak walkthrough and written numbers, and ask whether before-and-after retesting is available.
Should I get a blower door test before air sealing?+
Yes, if you want to spend efficiently and prove the result. A before test gives you a baseline (CFM50 and ACH50) and, more importantly, a map of where the biggest leaks are, so your air sealing dollars go to the attic hatch, top plates, and rim joist instead of caulking trim that barely matters. An after test confirms the house actually got tighter, which is the cleanest proof the work paid off. Bundling both tests with the same contractor is usually cheaper than two separate visits, so ask about a before-and-after package.
Try the companion tool
This post links to an interactive tool built for this topic. Open it to see numbers tailored to your home.
Open the toolGet practical energy tips
Join homeowners getting practical tips on cutting energy bills and staying comfortable.
Practical tips only. Unsubscribe anytime.
Read this next
Related guides selected by topic overlap and upgrade path.

A professional home energy audit typically costs $200–$700 in 2026, and many utilities offer free or low-cost assessments. Here's what each price tier gets you.

Attic insulation costs about $1,500 to $3,500 for a typical home, or $1.50 to $4 per sq ft. See 2026 prices by material, attic size, and tax credit.

Blown-in insulation costs $1.50 to $3.50 per sq ft installed in 2026 ($0.90 to $1.80 DIY). Cellulose vs fiberglass by R-value, attic vs walls, bags needed.
Attic insulation removal costs $1–$2 per sq ft, or about $1,600–$3,600 for a typical attic. Rodents, mold, or asbestos push it far higher. Here's the honest 2026 breakdown.